
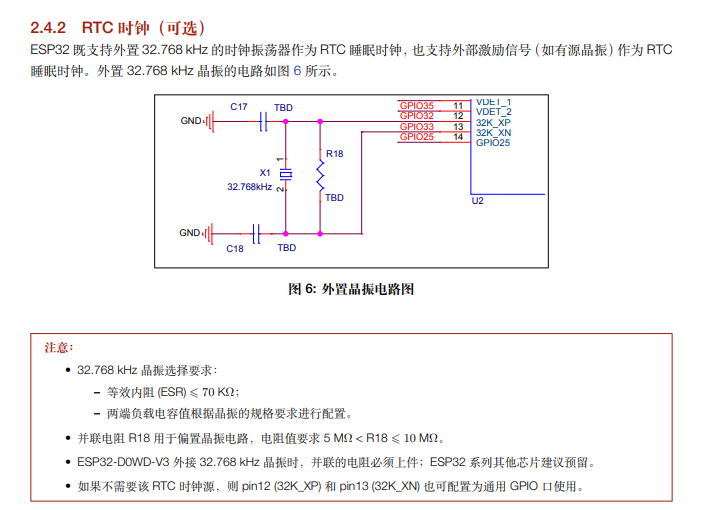
好久不见!又到了一年夏季,去年到现在攒了一大堆活没整,今天先整一个简单的,用 ESP32 作为蓝牙 Beacon 模拟 airtag 使用(白嫖)苹果的 Find My 网络进行查找。
What you need
- ESP32 开发版
- 一台 Mac(或者黑苹果 / 黑果虚拟机)
- 32.768kHz 无源晶振(可选)
- 两颗 10pF 电容(可选)
- 5-10 兆欧电阻(可选)
- 电池
- 烙铁
引子
前段日子每日逛 GitHub 的时候发现了一个很有意思的开源仓库,这个团队早在 2019 年就开始逆向工程苹果的 Find My 网络,站在 Seemoo Lab 的项目之上,我们免去了逆向工程的麻烦,可以直接使用来自他们的代码工作。
警告 本项目(OpenHaystack 以及本人基于其代码构建的软体)均为实验性软件,代码未经测试或不完整。本项目不隶属于 Apple Inc.,也不受支持
实践
构建硬件
将购得的硬件按如图方式飞线焊接之后,即可进行下一步操作
硬件设计手册
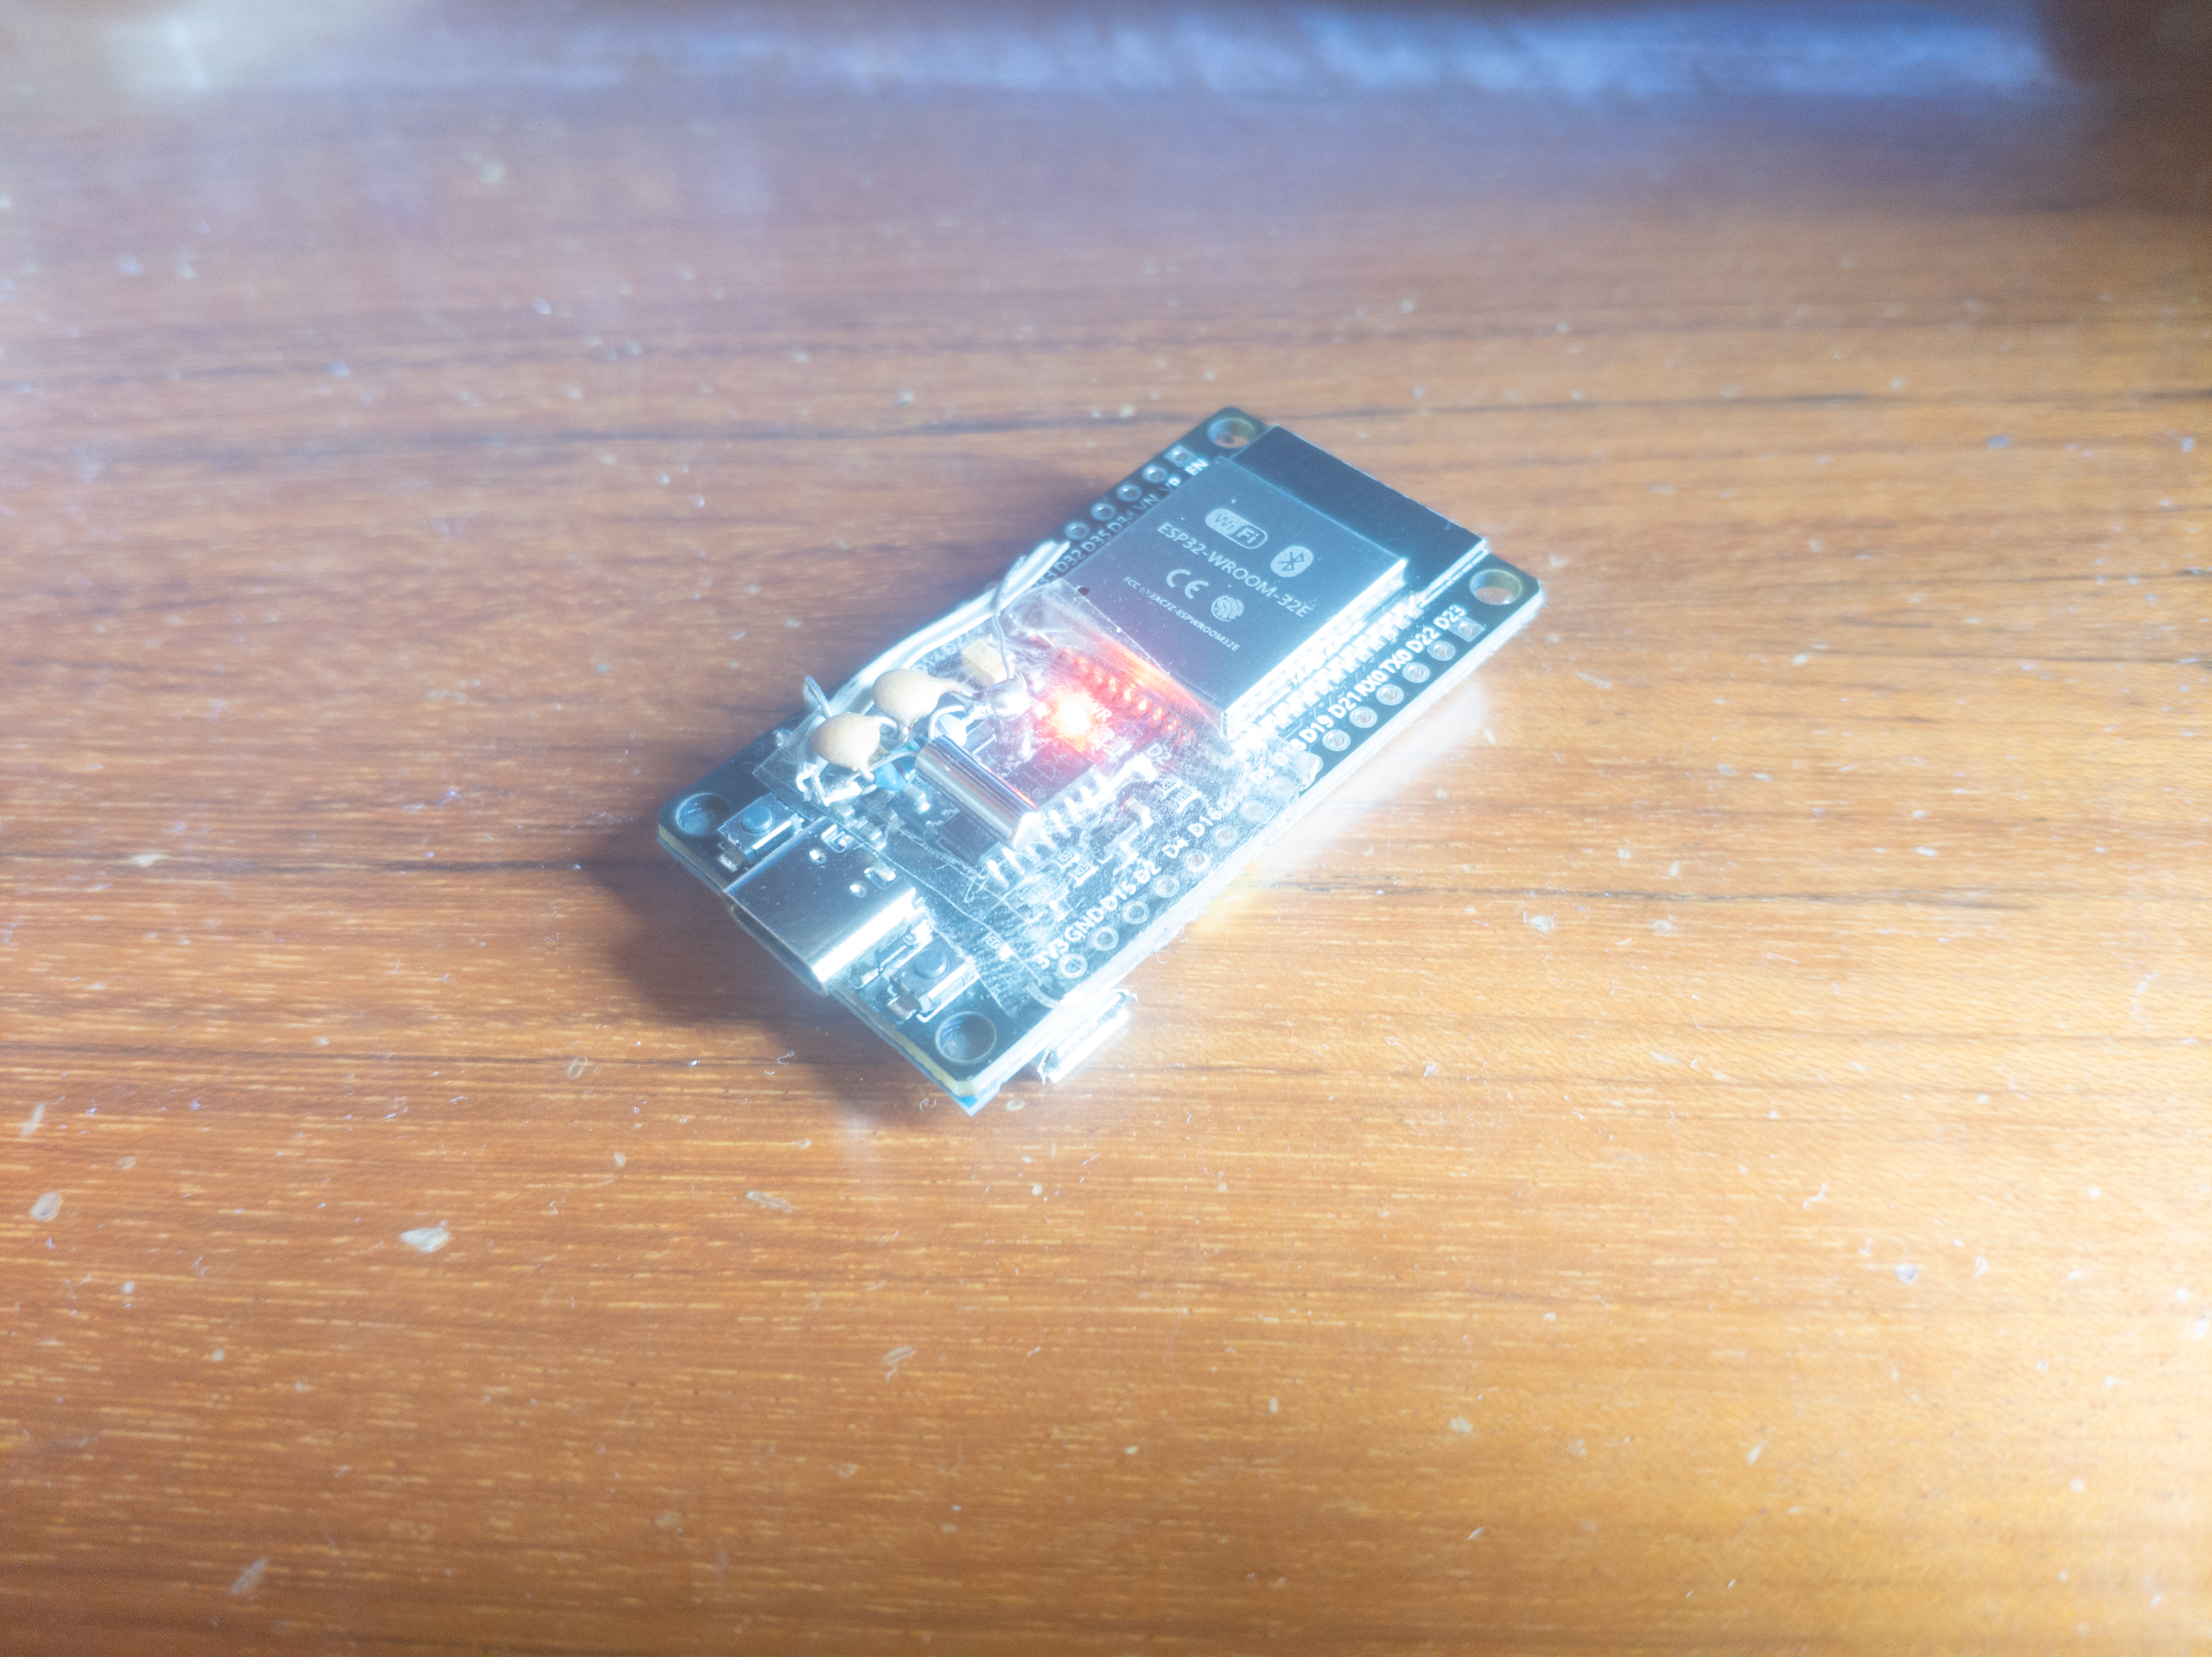
美妙的飞线
完成了上述硬件操作之后,着手构建软件
安装软件
- 在你的 Mac 上下载安装 openhaystack 的软件
- 打开 OpenHayStack 然后安装插件到
~/Library/Mail/Bundle. - 在终端中输入
sudo spctl --master-disable来暂时关闭 Mac 的 Gatekeeper 服务以运行邮箱插件 - 打开苹果自带邮件。打开 Preferences → General → Manage Plug-Ins… 然后点击 OpenHaystackMail.mailbundle 旁边的复选框以启用
- 如果没有管理插件按钮,请在终端输入
sudo defaults write "/Library/Preferences/com.apple.mail" EnableBundles 1
- 允许访问并重启邮件 App
- 打开终端输入
sudo spctl --master-enable, 重新打开 Gatekeeper 服务
在 OpenHaystack 中点击加号新建一个物品,复制他的 Advertisement Key(base64),作者原版的软件没有发挥出 ESP32 的省电潜能(没有使用到 Light Sleep 或者 Modem Sleep 模式),300mAh 的电池不足以支撑它发信 24H,故此处不使用官方固件(若要使用可以直接点击 Deploy 选择 esp32 刷入)
构建固件
准备好一个 esp-idf 运行环境(或者跟随本文使用 docker),克隆本仓库,在 Firmware/ESP32/main 中更改 openhaystack_main.c,下面附上我修改过的文件
GitHubseemoo-lab/openhaystackBuild your own 'AirTags' 🏷 today! Framework for tracking personal Bluetooth devices via Apple's massive Find My network. https://owlink.org 6997 378
#include <stdint.h>
#include <string.h>
#include <stdbool.h>
#include <stdio.h>

#include "nvs_flash.h"
#include "esp_partition.h"

#include "esp_bt.h"
#include "esp_gap_ble_api.h"
#include "esp_gattc_api.h"
#include "esp_gatt_defs.h"
#include "esp_bt_main.h"
#include "esp_bt_defs.h"
#include "esp_log.h"
#include "freertos/FreeRTOS.h"
#include "esp_err.h"
#include "esp_pm.h"
static const char* LOG_TAG = "open_haystack";

/** Callback function for BT events */
static void esp_gap_cb(esp_gap_ble_cb_event_t event, esp_ble_gap_cb_param_t *param);

/** Random device address */
static esp_bd_addr_t rnd_addr = { 0xFF, 0xBB, 0xCC, 0xDD, 0xEE, 0xFF };

/** Advertisement payload */
static uint8_t adv_data[31] = {
	0x1e, /* Length (30) */
	0xff, /* Manufacturer Specific Data (type 0xff) */
	0x4c, 0x00, /* Company ID (Apple) */
	0x12, 0x19, /* Offline Finding type and length */
	0x00, /* State */
	0x00, 0x00, 0x00, 0x00, 0x00, 0x00, 0x00, 0x00,
	0x00, 0x00, 0x00, 0x00, 0x00, 0x00, 0x00, 0x00,
	0x00, 0x00, 0x00, 0x00, 0x00, 0x00,
	0x00, /* First two bits */
	0x00, /* Hint (0x00) */
};

/* https://docs.espressif.com/projects/esp-idf/en/latest/esp32/api-reference/bluetooth/esp_gap_ble.html#_CPPv420esp_ble_adv_params_t */
static esp_ble_adv_params_t ble_adv_params = {
    // Advertising min interval:
    // Minimum advertising interval for undirected and low duty cycle
    // directed advertising. Range: 0x0020 to 0x4000 Default: N = 0x0800
    // (1.28 second) Time = N * 0.625 msec Time Range: 20 ms to 10.24 sec
    .adv_int_min        = 0x4000, // 10.24s
    // Advertising max interval:
    // Maximum advertising interval for undirected and low duty cycle
    // directed advertising. Range: 0x0020 to 0x4000 Default: N = 0x0800
    // (1.28 second) Time = N * 0.625 msec Time Range: 20 ms to 10.24 sec
    .adv_int_max        = 0x4000, // 10.24s,长间隔有助于省电
    // Advertisement type
    .adv_type           = ADV_TYPE_NONCONN_IND,
    // Use the random address
    .own_addr_type      = BLE_ADDR_TYPE_RANDOM,
    // All channels
    .channel_map        = ADV_CHNL_ALL,
    // Allow both scan and connection requests from anyone.
    .adv_filter_policy = ADV_FILTER_ALLOW_SCAN_ANY_CON_ANY,
};

static void esp_gap_cb(esp_gap_ble_cb_event_t event, esp_ble_gap_cb_param_t *param)
{
    esp_err_t err;

    switch (event) {
        case ESP_GAP_BLE_ADV_DATA_RAW_SET_COMPLETE_EVT:
            esp_ble_gap_start_advertising(&ble_adv_params);
            break;

        case ESP_GAP_BLE_ADV_START_COMPLETE_EVT:
            //adv start complete event to indicate adv start successfully or failed
            if ((err = param->adv_start_cmpl.status) != ESP_BT_STATUS_SUCCESS) {
                ESP_LOGE(LOG_TAG, "advertising start failed: %s", esp_err_to_name(err));
            } else {
                ESP_LOGI(LOG_TAG, "advertising has started.");
            }
            break;

        case ESP_GAP_BLE_ADV_STOP_COMPLETE_EVT:
            if ((err = param->adv_stop_cmpl.status) != ESP_BT_STATUS_SUCCESS){
                ESP_LOGE(LOG_TAG, "adv stop failed: %s", esp_err_to_name(err));
            }
            else {
                ESP_LOGI(LOG_TAG, "stop adv successfully");
            }
            break;
        default:
            break;
    }
}

int load_key(uint8_t *dst, size_t size) {
    const esp_partition_t *keypart = esp_partition_find_first(0x40, 0x00, "key");
    if (keypart == NULL) {
        ESP_LOGE(LOG_TAG, "Could not find key partition");
        return 1;
    }
    esp_err_t status;
    status = esp_partition_read(keypart, 0, dst, size);
    if (status != ESP_OK) {
        ESP_LOGE(LOG_TAG, "Could not read key from partition: %s", esp_err_to_name(status));
    }
    return status;
}

void set_addr_from_key(esp_bd_addr_t addr, uint8_t *public_key) {
	addr[0] = public_key[0] | 0b11000000;
	addr[1] = public_key[1];
	addr[2] = public_key[2];
	addr[3] = public_key[3];
	addr[4] = public_key[4];
	addr[5] = public_key[5];
}

void set_payload_from_key(uint8_t *payload, uint8_t *public_key) {
    /* copy last 22 bytes */
	memcpy(&payload[7], &public_key[6], 22);
	/* append two bits of public key */
	payload[29] = public_key[0] >> 6;
}

void app_main(void)
{
    esp_pm_config_esp32_t pm_config = {
        .max_freq_mhz = 80, // e.g. 80, 160, 240
        .min_freq_mhz = 40, // e.g. 40
        .light_sleep_enable = true, // enable light sleep
    };//降频,省电
    ESP_ERROR_CHECK( esp_pm_configure(&pm_config) );
    ESP_ERROR_CHECK(nvs_flash_init());
    ESP_ERROR_CHECK(esp_bt_controller_mem_release(ESP_BT_MODE_CLASSIC_BT));
    esp_bt_controller_config_t bt_cfg = BT_CONTROLLER_INIT_CONFIG_DEFAULT();
    esp_bt_controller_init(&bt_cfg);
    esp_bt_controller_enable(ESP_BT_MODE_BLE);

    esp_bluedroid_init();
    esp_bluedroid_enable();

    // Load the public key from the key partition
    static uint8_t public_key[28];
    if (load_key(public_key, sizeof(public_key)) != ESP_OK) {
        ESP_LOGE(LOG_TAG, "Could not read the key, stopping.");
        return;
    }

    set_addr_from_key(rnd_addr, public_key);
    set_payload_from_key(adv_data, public_key);

    ESP_LOGI(LOG_TAG, "using device address: %02x %02x %02x %02x %02x %02x", rnd_addr[0], rnd_addr[1], rnd_addr[2], rnd_addr[3], rnd_addr[4], rnd_addr[5]);

    esp_err_t status;
    //register the scan callback function to the gap module
    if ((status = esp_ble_gap_register_callback(esp_gap_cb)) != ESP_OK) {
        ESP_LOGE(LOG_TAG, "gap register error: %s", esp_err_to_name(status));
        return;
    }

    if ((status = esp_ble_gap_set_rand_addr(rnd_addr)) != ESP_OK) {
        ESP_LOGE(LOG_TAG, "couldn't set random address: %s", esp_err_to_name(status));
        return;
    }
    if ((esp_ble_gap_config_adv_data_raw((uint8_t*)&adv_data, sizeof(adv_data))) != ESP_OK) {
        ESP_LOGE(LOG_TAG, "couldn't configure BLE adv: %s", esp_err_to_name(status));
        return;
    }
    ESP_LOGI(LOG_TAG, "application initialized");
}
同时,我们需要指定 esp32 ble 睡眠时钟为外置晶振以释放睡眠锁,在 ESP32 目录输入 docker run --rm -v $PWD:/project -w /project -it espressif/idf 进入 esp-idf 环境,运行 idf.py menuconfig ,进入 Component config
- (Top) → Component config → Hardware Settings → RTC Clock Config 中切换 RTC clock source 为 External 32kHz crystal
- (Top) → Component config → Power Management 中打开 Support for power management
- (Top) → Component config → Bluetooth → Controller Options → MODEM SLEEP Options 中打开 Bluetooth modem sleep 且切换 Bluetooth low power clock 为 External 32kHz crystal
之后输入 idf.py build 再使用./flash_esp32.sh -p /dev/yourSerialPort "Base64-encoded advertisement key" 刷入固件即可
效果
刷入固件后会在 15 分钟左右获得回报数据,暂时只能在 OpenHaystack 应用中查看位置数据,在苹果地图国际版中定位精确,若使用国内版苹果地图会出现 WGS-84 坐标转换为 GCJ02 火星坐标的问题,目前没有修复。
结语
离线查找网络无非是一个大坑,基于它全球的用户数量,苹果有能力去踩这个坑,Find My Network 无非是一个创举,之后肯定会被其他公司争相模仿(如本文撰写完成时发布的 Huawei Tag),用华为的网络对比苹果的网络,苹果的用户分布更广,网络设计更加透明,且当前 Huawei Tag 仅支持中国大陆境内销售的设备,未来可能还会有 Xiaomi Tag 等等产品,当然,适合自己的才是最好的(价位,精准度,续航等)
说回 Find My Network,网络设计的目的是让用户安全隐私的得到自己的离线设备的位置而无需承担传统 GPS 定位器的联网成本和续航问题,有居心叵测之人利用这个网络是无法避免的,苹果为此做出了防范,在 Apple 设备上会有 Tag 跟踪提示,但是对于安卓设备只能通过第三方软件实现(如同属上组织的 AirGuard),如果用户没有此类软件则只能依靠 Airtag 自己发声意识到自己被跟踪,希望各位读者可以提高自身防范意识,避免隐私泄露。
本文仅做可行性分析实践,依靠此教程行违法乱纪之事作者不承担任何责任!另付上在中国使用以上工具实施跟踪行为可能触犯的法规
《中华人民共和国治安管理处罚法》第四十二条 有下列行为之一的,处五日以下拘留或者五百元以下罚款;情节较重的,处五日以上十日以下拘留,可以并处五百元以下罚款: (一)写恐吓信或者以其他方法威胁他人人身安全的; (二)公然侮辱他人或者捏造事实诽谤他人的; (三)捏造事实诬告陷害他人,企图使他人受到刑事追究或者受到治安管理处罚的; (四)对证人及其近亲属进行威胁、侮辱、殴打或者打击报复的; (五)多次发送淫秽、侮辱、恐吓或者其他信息,干扰他人正常生活的; (六)偷窥、偷拍、窃听、散布他人隐私的。

Comments NOTHING